Let us drive the point home using a simple scenario. For eg., in the
current month ie.,(01-01-2010) we are provided with an source table with
the three columns and three rows in it like (EMpno,Ename,Sal). There is
a new employee added and one change in the records in the month
(01-02-2010). We are gonna use the SCD-2 style to extract and load the
records in to target table.
Target Table: (01-01-11)
Source Table: (01-02-11)
Target Table: (01-02-11)
In
the second Month we have one more employee added up to the table with
the Ename D and salary of the Employee is changed to the 2500 instead of
2000.
Step 1: Is to import Source Table and Target table.
(iii) Connection Information ->Oracle.
Expression Transformation: After we are done with the Lookup Transformation we are using an expression transformation to find whether the data on the source table matches with the target table. We specify the condition here whether to insert or to update the table. The steps to create an Expression Transformation are shown below.
Update: iif(Not isnull (Skey) and Decode(SAL,SAL1,1,0)=0,1,0) .
(ii) The value for the filter condition 2 is Update.
Sequence Generator: We use this to generate an incremental cycle of sequential range of number.The purpose of this in our mapping is to increment the skey in the bandwidth of 100.

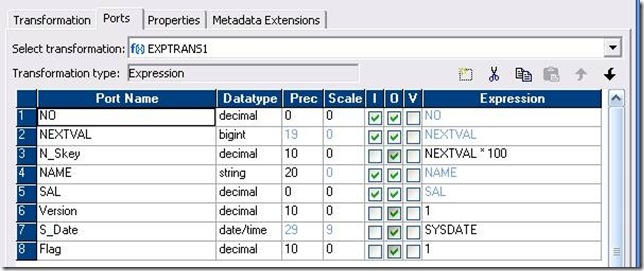
Exp 1: It updates the target table with the skey values. Point to be noticed here is skey gets multiplied by 100 and a new row is generated if there is any new EMP added to the list. Else the there is no modification done on the target table.
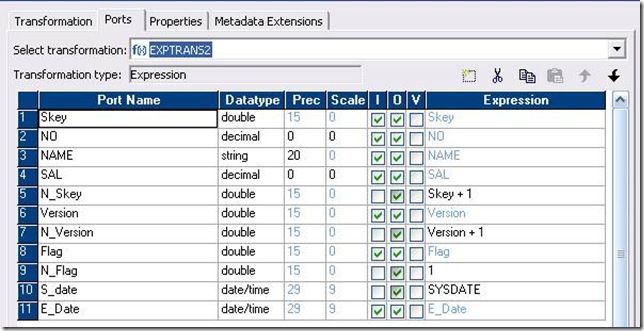
Exp 3: If any record of in the source table gets updated then we make it only as the output.

Step 4: Preview the Output in the target table.
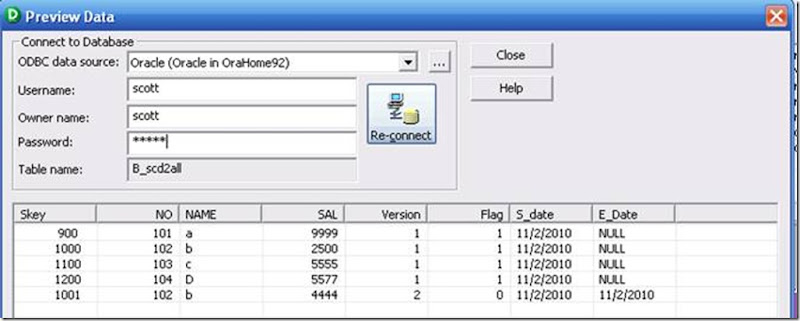
- The thing to be noticed here is if there is any update in the salary of any employee then the history of that employee is displayed with the current date as the start date and the previous date as the end date.
| Emp no | Ename | Sal |
| 101 | A | 1000 |
| 102 | B | 2000 |
| 103 | C | 3000 |
| Skey | Emp no | Ename | Sal | S-date | E-date | Ver | Flag |
| 100 | 101 | A | 1000 | 01-01-10 | Null | 1 | 1 |
| 200 | 102 | B | 2000 | 01-01-10 | Null | 1 | 1 |
| 300 | 103 | C | 3000 | 01-01-10 | Null | 1 | 1 |
Source Table: (01-02-11)
| Emp no | Ename | Sal |
| 101 | A | 1000 |
| 102 | B | 2500 |
| 103 | C | 3000 |
| 104 | D | 4000 |
| Skey | Emp no | Ename | Sal | S-date | E-date | Ver | Flag |
| 100 | 101 | A | 1000 | 01-02-10 | Null | 1 | 1 |
| 200 | 102 | B | 2000 | 01-02-10 | Null | 1 | 1 |
| 300 | 103 | C | 3000 | 01-02-10 | Null | 1 | 1 |
| 201 | 102 | B | 2500 | 01-02-10 | 01-01-10 | 2 | 0 |
| 400 | 104 | D | 4000 | 01-02-10 | Null | 1 | 1 |
Step 1: Is to import Source Table and Target table.
- Create a table by name emp_source with three columns as shown above in oracle.
- Import the source from the source analyzer.
- Drag the Target table twice on to the mapping designer to facilitate insert or update process.
- Go to the targets Menu and click on generate and execute to confirm the creation of the target tables.
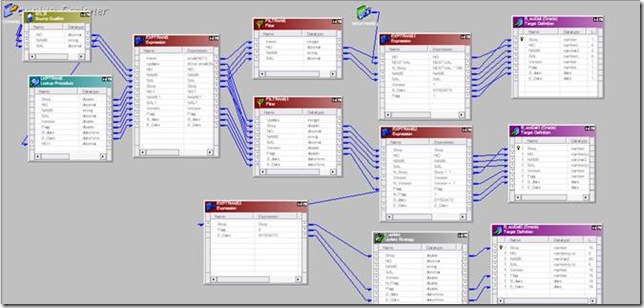
- The snap shot of the connections using different kinds of transformations are shown below.

- In The Target Table we are goanna add five columns (Skey, Version, Flag, S_date ,E_Date).
- Here in this transformation we are about to use four kinds of transformations namely Lookup transformation (1), Expression Transformation (3), Filter Transformation (2), Sequence Generator. Necessity and the usage of all the transformations will be discussed in detail below.
- The first thing that we are gonna do is to create a look up transformation and connect the Empno from the source qualifier to the transformation.
- The snapshot of choosing the Target table is shown below.

- Drag the Empno column from the Source Qualifier to the Lookup Transformation.
- The Input Port for only the Empno1 should be checked.
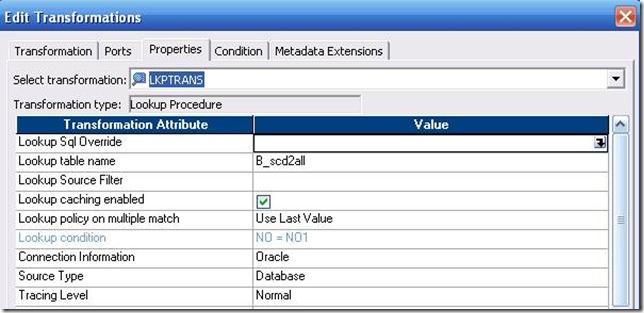
- In the Properties tab (i) Lookup table name ->Emp_Target.
(iii) Connection Information ->Oracle.
- In the Conditions tab (i) Click on Add a new condition
Expression Transformation: After we are done with the Lookup Transformation we are using an expression transformation to find whether the data on the source table matches with the target table. We specify the condition here whether to insert or to update the table. The steps to create an Expression Transformation are shown below.
- Drag all the columns from both the source and the look up transformation and drop them all on to the Expression transformation.
- Now double click on the Transformation and go to the Ports tab and create two new columns and name it as insert and update. Both these columns are goanna be our output data so we need to have unchecked input check box.
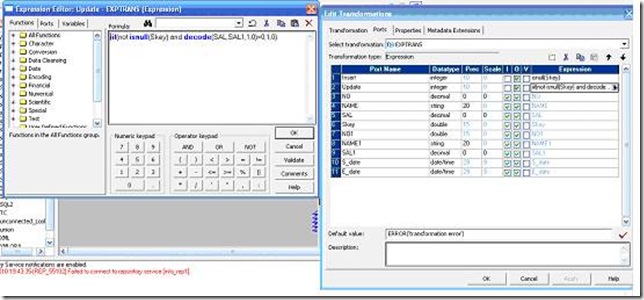
- The Snap shot for the Edit transformation window is shown below.

- The condition that we want to parse through our output data are listed below.
Update: iif(Not isnull (Skey) and Decode(SAL,SAL1,1,0)=0,1,0) .
- We are all done here .Click on apply and then OK.
- If there is no change in input data then filter transformation 1 forwards the complete input to Exp 1 and same output is goanna appear in the target table.
- If there is any change in input data then filter transformation 2 forwards the complete input to the Exp 2 then it is gonna forward the updated input to the target table.
- Go to the Properties tab on the Edit transformation
(ii) The value for the filter condition 2 is Update.
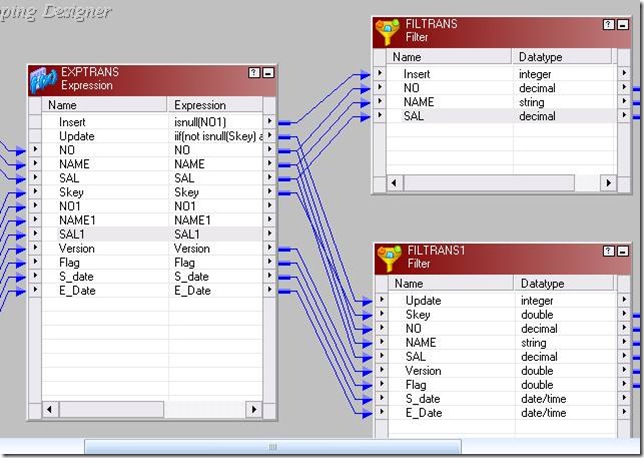
- The closer view of the connections from the expression to the filter is shown below.

Sequence Generator: We use this to generate an incremental cycle of sequential range of number.The purpose of this in our mapping is to increment the skey in the bandwidth of 100.

- We are gonna have a sequence generator and the purpose of the sequence generator is to increment the values of the skey in the multiples of 100 (bandwidth of 100).
- Connect the output of the sequence transformation to the Exp 1.
Exp 1: It updates the target table with the skey values. Point to be noticed here is skey gets multiplied by 100 and a new row is generated if there is any new EMP added to the list. Else the there is no modification done on the target table.

- Drag all the columns from the filter 1 to the Exp 1.
- Now add a new column as N_skey and the expression for it is gonna be Nextval1*100.
- We are goanna make the s-date as the o/p and the expression for it is sysdate.
- Flag is also made as output and expression parsed through it is 1.
- Version is also made as output and expression parsed through it is 1.
- Drag all the columns from the filter 2 to the Exp 2.
- Now add a new column as N_skey and the expression for it is gonna be Skey+1.
- Both the S_date and E_date is gonna be sysdate.

Exp 3: If any record of in the source table gets updated then we make it only as the output.

- If change is found then we are gonna update the E_Date to S_Date.
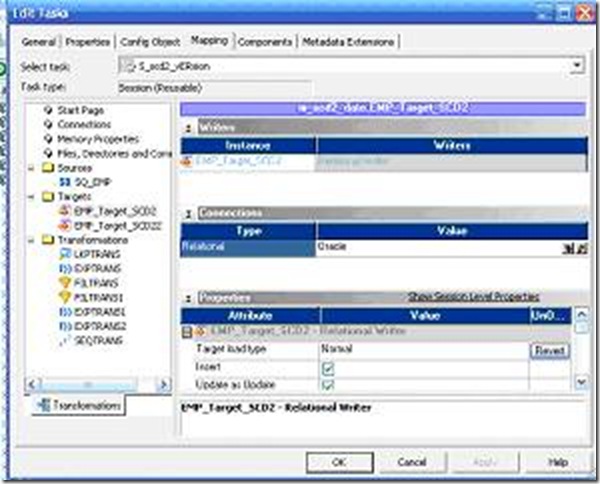
- The update strategy expression is set to 1.
- Don’t check the truncate table option.
- Change Bulk to the Normal.
- Run the work flow from task.
- Create the task and run the work flow.

Step 4: Preview the Output in the target table.

No comments:
Post a Comment